Design guidance for successful metal 3D printing
+
Well-designed is half done! 3D printing enables completely new structures and solutions, pushing the boundaries we know. By recognising a few basic rules and avoiding known pitfalls, you can achieve more and get it done right the first time.
This page goes through the design rules and guidelines essential for success. Whatever questions you may have, please get in touch with us.


Design is at the heart of everything in printing
You can print “everything”, but you shouldn’t.
Leave out all unnecessary shapes and material. While in traditional manufacturing, the material left out costs money, in 3D printing, it’s an equal saving. So less is more.
The harder it is to machine a part, the more efficient it is to print it. In the same way, if a piece is effortless to machine, printing is only worthwhile for specific reasons, such as delivery time.
The most significant benefits we achieve when the component’s goal and purpose are the design’s starting point. Topology optimisation and flow calculation support the process.
We can improve the printability of existing designs by lightening them with hollow and grid structures and by not printing irrelevant shapes. Alternative materials can also provide additional durability and cost benefits.
Metal 3D Printing is a mature production technology that boosts competitiveness
Basic rules for designing a 3D-printed metal component
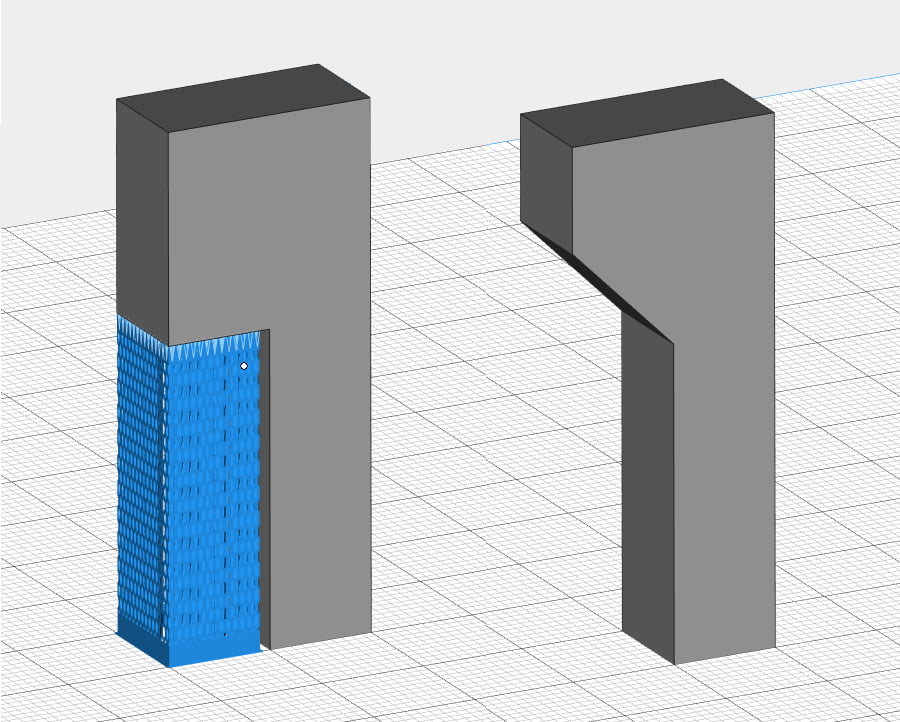
You can't build on nothing
- Design the piece’s shapes to be built at a 45-degree angle or more vertically -> avoid using support material.
- Material, process and geometry will affect the possible angle. Sometimes even nearly horizontal construction is possible, sometimes 45 degrees is a challenge -> if in doubt, contact our support.
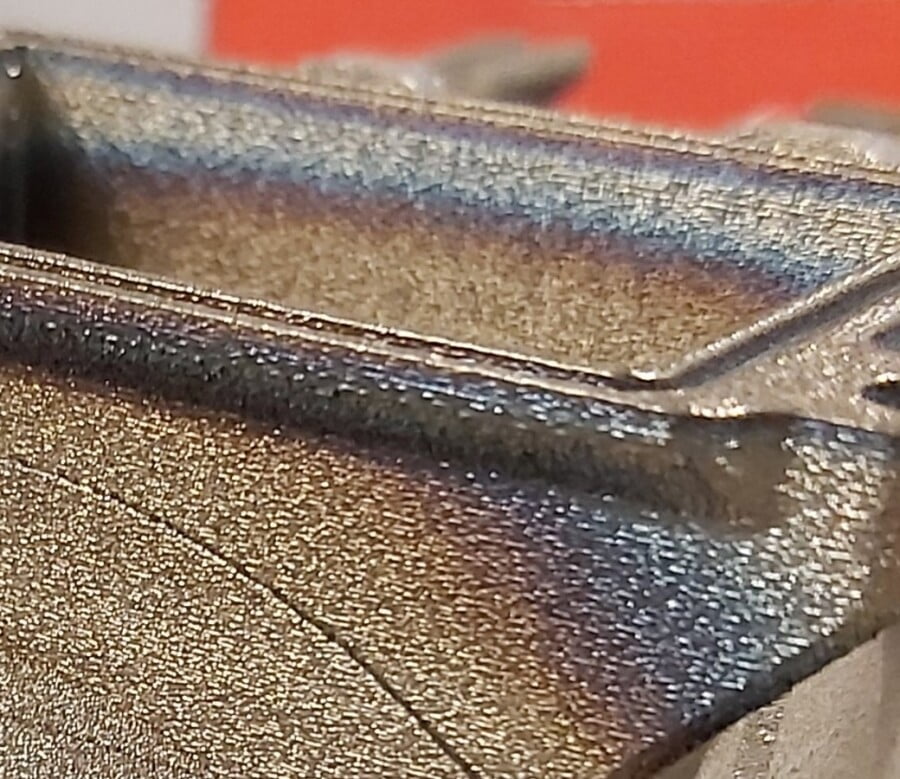
A lot of heat is generated when melting metal and needs to be conducted away from the part
- Avoid building thick geometries over thin walls, as the heat will not want to dissipate sufficiently and will cause distortion and colour defects.
- The thinnest wall recommendation is 0.7mm to 1mm; however, we can build walls up to 0.3mm with certain restrictions.
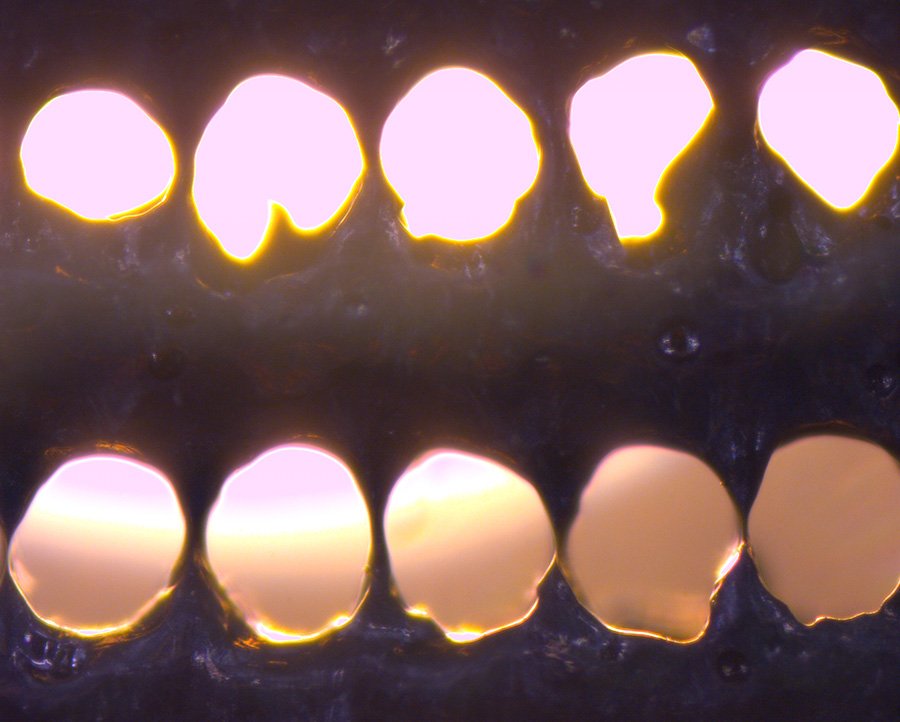
Printing holes is free
- Printed channels can be completely free in shape. However, it is worth remembering that the shape of the hole should not be circular for horizontal holes of less than 1 mm and more than 6mm in diameter.
- Either oval, teardrop, diamond, or any other shape that reduces the circular radius of the hole roof will work better for printing.
What shape can we 3D print, and what details should I avoid? Download here


The target is the correct form and high accuracy
Due to heat and stresses created during printing, the shape of the part may change at different stages of the process. We can reduce this by the correct printing position and support structures. Support structures anchor the piece to the building plate and conduct the process heat away.
Metal prints are pretty accurate and have a good surface finish, so they are often adequate as printed. However, precise shapes, toleranced dimensions and demanding surface finishes are achieved by machining.
- For printing, it would be helpful to know the surfaces that affect the part’s functionality to avoid unnecessary rework.
- Often, only certain sealing surfaces, joint surfaces, bearing housings, etc., must be machined.
Design the whole manufacturing chain
- Metal prints are accurate; 0.5 mm – 1 mm machining allowance for parts needing postprocessing is typically enough.
- The finishing operations are short; only a finishing chip on the surface is required.
- Some of the materials used for printing will challenge even the most experienced machinist. When needed, please get in touch with us.
- Printed, optimised geometries and structures can be challenging to attach during machining. So consider the machining step and the clamping surfaces when designing your component; you can save costs and effort.
- Printing clamping surfaces is cheaper than printing jigs.
- In some cases, the structure does not allow for clamping surfaces, and a printed jig is the best solution. Contact us for further information.

The surface treatment finishes your solution
Your metal printing partner Delva supports you in choosing the proper surface treatment and, if you wish, delivers your parts ready with finishing.

Material matters when printing
There are so-called easy and difficult printing materials. The differences are mainly due to stresses and heat conduction. Shared experiences help to identify and avoid issues already at the design stage.
- AlSi10Mg is one of the easiest and can be used to build shapes that break printing rules and constraints.
- Inconel 939 is among the more difficult materials to print; challenges can arise even with simpler geometries.
Your 3D printing service partner breaks boundaries
- Quality comes from quality materials, sound machines and tested parameters. Careful heat treatment puts the finishing touches on the desired properties.
- If we cannot achieve desired results when printing with the basic parameters, it is possible to adjust the printing parameters. The same applies to heat treatment.
- An experienced operator familiar with the process can predict the effects of parameter adjustment, which material tests should, however, verify.
- The same applies to heat treatment. Read more about the effects of heat treatment and the research on it here.

Contact us and we will help you to find the best solution for your business.

Markku Lindqvist
CTO
markku.lindqvist@delva.fi
+358 50 522 5016
Eetu Kivirasi
AM Specialist
eetu.kivirasi@delva.fi
+358 50 336 8766